Tuesday, October 27, 2015

Send print jobs from your computer to the Xerox printer

Why print to the Xerox printer?

Whenever you have a large printing job you might consider sending it to the Xerox printer. "Large printing job" is more than a class set or more than 100 pages - whichever is larger.

Why walk all the way to Faculty Services to pick up your printing when you can just print it in your office? The Xerox is much faster, and with large packets for multiple classes it will still take less time to walk to the office and back to pick up your printing than it would to print hundreds of pages in your office. It is also much cheaper to print to the Xerox. The cost is about 90% less. Printing is the largest expense of the school's technology supply budget, and saving money on toner means spending money on other classroom technology tools.

Add the Xerox Printer

  1. Open the "Add Printers" page. It can be found in the D211 folder in your Bookmarks in Google Chrome and Internet Explorer, and it can be found as a shortcut on your desktop.
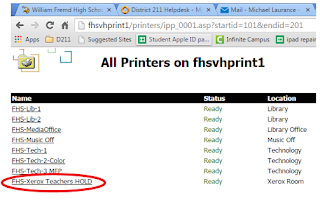
  2. Find the printer named "Xerox Teachers HOLD" in the list of all printers in the school. It might be on the second page of the list.
  3. Add the printer to your computer's list by choosing Connect.
  4. You will be asked if you want to add the printer named Xerox Teachers HOLD. Choose Yes.

Printing on the Xerox printer

  1. When it's time to print your document, your assessment bubble sheets, or work packets click Print, then find the printer named Xerox Teachers HOLD (red circle). Do not hit print yet! There are some extra options in the Preferences section (blue circle). Click Preferences then move to step two.

  2. Choose your Finishing Options like single-sided or double-sided printing and stapling. Yes, STAPLING! There are other options as well. Explore the tabs to find additional features. When you have finished choosing your options, choose OK and then choose Print.


Thursday, May 14, 2015

Complete the "Parent Contact" Requirement in Infinite Campus

By the end of each school year, teachers must report if they had at least one conversation with a parent of each child in their classes. These are the steps for teachers to report parent contact which is recorded in Infinite Campus.
  1. Log in to Infinite Campus
  2. Click on Instruction then click on Positive Attendance. Both are circled in red. A roster of the class will appear. 
  3. Click on a student's name. (You will repeat these steps for every student so it's best to start at the top and work your way down.)
  4. Click on the D211 General tab.
  5. Check the box underneath Contacted Parent then click Save.
  6. You must repeat these steps for every student in every class.

Tuesday, April 7, 2015

Six new and improved features in Infinite Campus

Some of the new features in Infinite Campus include the ability to record grades using an iPad, create a customized drag-and-drop seating chart, and providing color-coded grades to show overall class progress at a quick glance. These features are available right now by logging in to Infinite Campus <campus.d211.org> and clicking on the Campus Instruction button in the top right of the screen.


#1 Accessing IEPs and 504 Plans
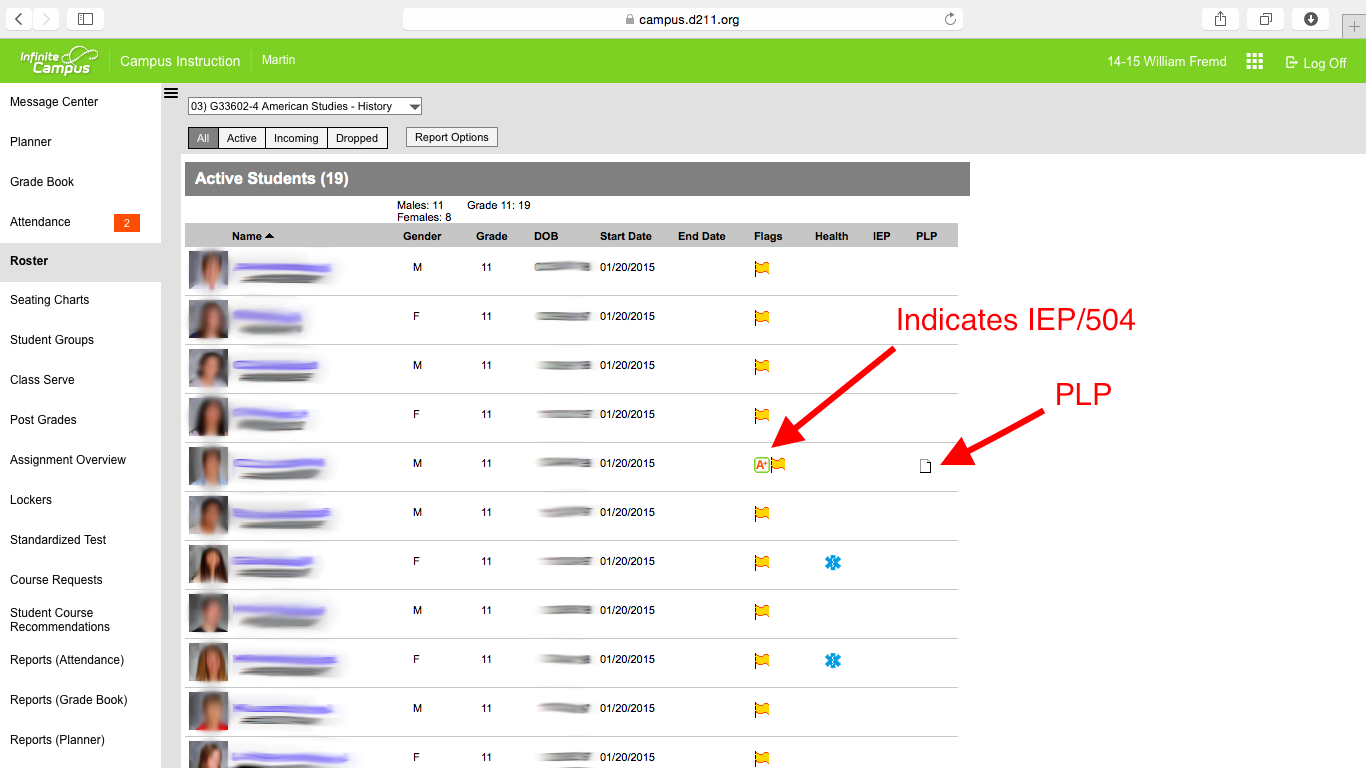
View IEPs, 504s, PLPs and Health Restrictions for your entire class within the Roster. On the far right, you can see which students have IEPs/504s. Click on the Paper icon to access specific details of the student’s Personalized Learning Plan (PLP).


#2 Creating an assignment
The “Create Assignment” viewer is visually more appealing and contains virtually the same aspects as our current version of Infinite Campus. However, you will now be able to add a description, add objectives, and add references which are all visible to students.


#3 Entering comments on individual assignments
Enter comments is much easier in the Campus Instruction version of Infinite Campus. You can now add comments for an individual student or the entire class from within the same window.

Click to expand the field in IC beta to add comments


Add a comment for an individual student


Fill comments for multiple students


#4 Spark Lines
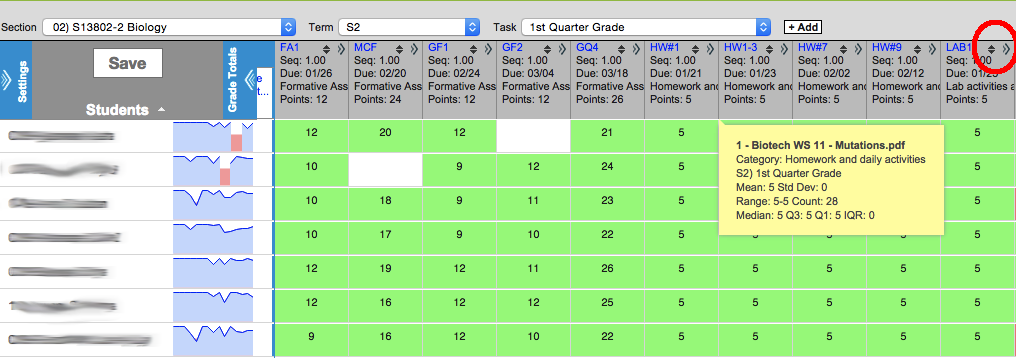
The sparkline graph is a great way to see how a student is doing over the course of the grading period.  It is also useful to show the students and the teacher how the student’s grades are compared to their classroom peers. On the standard gradebook screen you see the blue jagged line. That is each score over the course of the quarter compared to the max possible score.  When you click on a student, you see more detail about every score.  The yellow dot is the student’s score while the line at the top is the max score a student achieved on the assignment, while the line at the bottom is the lowest score.  In the following example, you can see that her first score of a 24 was the highest in the class, while her next score of a 4 is the lowest in the class.  The white square is explained below. If you just want to show a student this screen, you can click on the “Hide Others” button and then that student’s grades are the only one on the screen.


#5 Drag and drop seating

Instead of using straight rows and columns, you can now move seats into any arrangement and students can be dragged from one seat to another.


#6 Color coded grades
Grades can be colored green for passing grades and red for failing grades which provides the teacher with a quick visual of the students’ grades.


 Click here for a six-page PDF copy of the training session that was held on April 7, 2015.

Tuesday, January 27, 2015

Why should parents sign up for Schoology?

Schoology is used by teachers to post their classroom materials online, provide a safe forum for students to discuss their ideas and collaborate on projects, and to pass out and collect homework electronically. It helps students stay organized and it keeps the class connected.

An overlooked feature of Schoology is the ability for parents to create their own accounts which gives them access to their child's grades, their upcoming assignments, and classroom messages posted by the teacher. Parents can view any assignment submitted by their child, so not only do parents see the grade that was earned on the assignment but they can actually see the assignment that was turned in. Schoology helps parents to become more involved in their child's learning.

The one thing a parent will need to get started is the PARENT ACCESS CODE which can be given to them by the classroom teacher or emailed to them by a technology staff member. Contact your child's teacher first to get started!

Here are some helpful links to help you get started using Schoology.

  1. Create a new parent account using a Parent Access Code provided by your child's teacher
  2. Add multiple children to your Schoology account so you can access all of your children's information from one location
  3. Compare your parent account to your child's account to get an understanding of how Schoology works for you and for your child
  4. The Parents' Guide To Schoology provides a detailed explanation of how to use multiple features within Schoology