Wednesday, July 20, 2016

Schoology: Course Names, Course Codes, Section Names, and Section Codes

Setting up your courses for the beginning of the school year


Whether you are setting up courses in Schoology for the very first time or you are copying last year's courses into the new school year to begin fresh, it is best to set up your courses properly from the start. While most of the fields within "Create New Course" seem self-explanatory, there are some that can be confusing.


The "Create Course" window in Schoology

It is highly recommended that you edit your previous year's courses
before copying them into this school year.
You can find your old courses in the archives of your My Courses section.

Course Name

Using a standard format for the name of your courses will help keep your classes organized, and it helps improve your students' view of their entire class schedule. The best way to name your course in Schoology is to use the overall course name that is listed in the electronic gradebook.

Example Course Name: M328 Algebra 2

Course Code

Each course has a unique code that allows others to search for your courses if necessary. The code also keeps track of your courses year-after-year by placing every section in every year under the same course.

Example Course Code: M328

Section Code

Every course technically has a single, unique number to identify itself. This number can only be used once across the entire school district. The only way to upload a large number of students into a course is if that course has a section code. For example, our entire freshmen class of 680 students are enrolled in a course called Class of 2020 where they receive information and advice from their counselors during their four years of high school. The only way to enroll them quikcly is to assign the course a unique Section Code. You do not need to enter anything into this field unless you want the tech department to upload a large roster of students into your course.

Do not simply make up a random number for the section code. Every class has a section code that can be found in the electronic gradebook. In Infinite Campus' gradebook it is called the Section ID.


Section Name

One course, such as Algebra 2, can be taught multiple times per day and by several different teachers. A section is one class of students sitting in front of you (or online). There might be 20 different classes, or sections, of the same subject. Enter a different Section Code for each class, and use a name that makes sense to you. Some examples are:
  • Period One; Period Two; Period Three
  • P1; P2; P3
  • 2016-2017 P1; 2016-2017 P2; 2016-2017 P3
Some sections are co-taught by multiple teachers, or simply shared by all the teachers who are assigned to the course. If three teachers all teach Algebra, and they share those sections with each other, then their section naming convention might include their last name. For example:
  • Goettsche P1; Goettsche P2; Goettsche P3
  • Mantra P4; Mantra P5
  • Johnson P6

Course Description


In the syllabus of a course there is often an overall description of the course followed by the topics that will be taught during the year. At the high school level, most if not all courses have some type of official description.

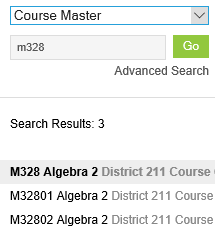
In our school district we can view all course descriptions from within the gradebook. Instead of searching for the Course or Section one will search for Course Master. All general information related to that course, which is taught by multiple teachers in five different high schools, can be viewed by clicking on the master course.
Adding a course description to your Schoology course provides students and parents with additional information about the class. The description of M328 below comes from our gradebook. A teacher can cut-and-paste the information into their Schoology course information by opening the class then going to Course Options -> Edit Info -> Details.

Course description for M328 found within the electronic gradebook

Tuesday, October 27, 2015

Send print jobs from your computer to the Xerox printer

Why print to the Xerox printer?

Whenever you have a large printing job you might consider sending it to the Xerox printer. "Large printing job" is more than a class set or more than 100 pages - whichever is larger.

Why walk all the way to Faculty Services to pick up your printing when you can just print it in your office? The Xerox is much faster, and with large packets for multiple classes it will still take less time to walk to the office and back to pick up your printing than it would to print hundreds of pages in your office. It is also much cheaper to print to the Xerox. The cost is about 90% less. Printing is the largest expense of the school's technology supply budget, and saving money on toner means spending money on other classroom technology tools.

Add the Xerox Printer

  1. Open the "Add Printers" page. It can be found in the D211 folder in your Bookmarks in Google Chrome and Internet Explorer, and it can be found as a shortcut on your desktop.
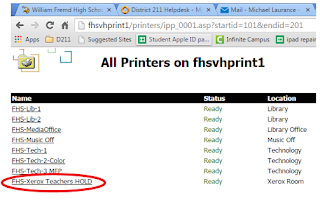
  2. Find the printer named "Xerox Teachers HOLD" in the list of all printers in the school. It might be on the second page of the list.
  3. Add the printer to your computer's list by choosing Connect.
  4. You will be asked if you want to add the printer named Xerox Teachers HOLD. Choose Yes.

Printing on the Xerox printer

  1. When it's time to print your document, your assessment bubble sheets, or work packets click Print, then find the printer named Xerox Teachers HOLD (red circle). Do not hit print yet! There are some extra options in the Preferences section (blue circle). Click Preferences then move to step two.

  2. Choose your Finishing Options like single-sided or double-sided printing and stapling. Yes, STAPLING! There are other options as well. Explore the tabs to find additional features. When you have finished choosing your options, choose OK and then choose Print.


Thursday, May 14, 2015

Complete the "Parent Contact" Requirement in Infinite Campus

By the end of each school year, teachers must report if they had at least one conversation with a parent of each child in their classes. These are the steps for teachers to report parent contact which is recorded in Infinite Campus.
  1. Log in to Infinite Campus
  2. Click on Instruction then click on Positive Attendance. Both are circled in red. A roster of the class will appear. 
  3. Click on a student's name. (You will repeat these steps for every student so it's best to start at the top and work your way down.)
  4. Click on the D211 General tab.
  5. Check the box underneath Contacted Parent then click Save.
  6. You must repeat these steps for every student in every class.

Tuesday, April 7, 2015

Six new and improved features in Infinite Campus

Some of the new features in Infinite Campus include the ability to record grades using an iPad, create a customized drag-and-drop seating chart, and providing color-coded grades to show overall class progress at a quick glance. These features are available right now by logging in to Infinite Campus <campus.d211.org> and clicking on the Campus Instruction button in the top right of the screen.


#1 Accessing IEPs and 504 Plans
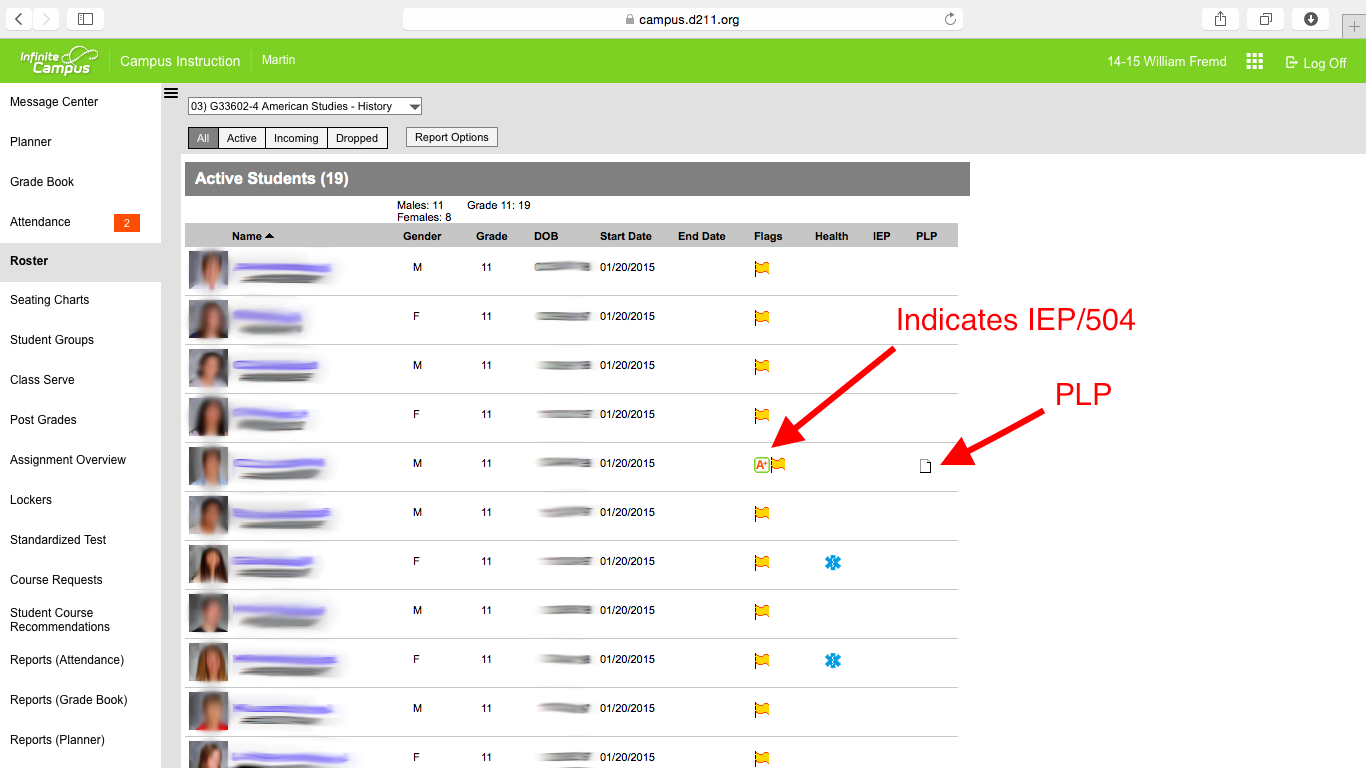
View IEPs, 504s, PLPs and Health Restrictions for your entire class within the Roster. On the far right, you can see which students have IEPs/504s. Click on the Paper icon to access specific details of the student’s Personalized Learning Plan (PLP).


#2 Creating an assignment
The “Create Assignment” viewer is visually more appealing and contains virtually the same aspects as our current version of Infinite Campus. However, you will now be able to add a description, add objectives, and add references which are all visible to students.


#3 Entering comments on individual assignments
Enter comments is much easier in the Campus Instruction version of Infinite Campus. You can now add comments for an individual student or the entire class from within the same window.

Click to expand the field in IC beta to add comments


Add a comment for an individual student


Fill comments for multiple students


#4 Spark Lines
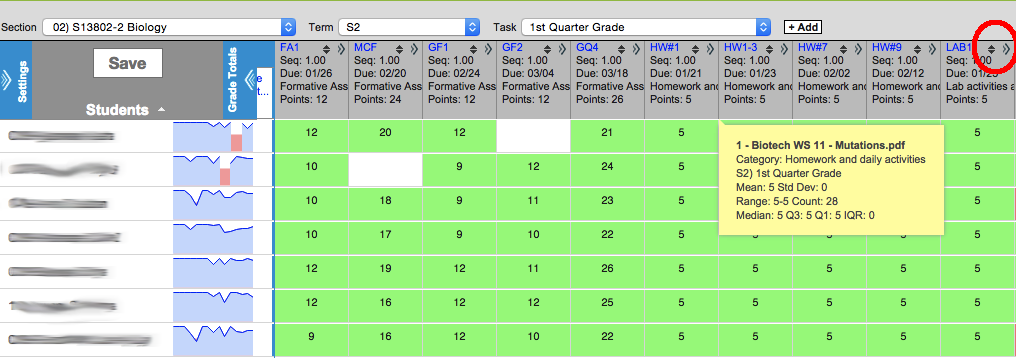
The sparkline graph is a great way to see how a student is doing over the course of the grading period.  It is also useful to show the students and the teacher how the student’s grades are compared to their classroom peers. On the standard gradebook screen you see the blue jagged line. That is each score over the course of the quarter compared to the max possible score.  When you click on a student, you see more detail about every score.  The yellow dot is the student’s score while the line at the top is the max score a student achieved on the assignment, while the line at the bottom is the lowest score.  In the following example, you can see that her first score of a 24 was the highest in the class, while her next score of a 4 is the lowest in the class.  The white square is explained below. If you just want to show a student this screen, you can click on the “Hide Others” button and then that student’s grades are the only one on the screen.


#5 Drag and drop seating

Instead of using straight rows and columns, you can now move seats into any arrangement and students can be dragged from one seat to another.


#6 Color coded grades
Grades can be colored green for passing grades and red for failing grades which provides the teacher with a quick visual of the students’ grades.


 Click here for a six-page PDF copy of the training session that was held on April 7, 2015.

Tuesday, January 27, 2015

Why should parents sign up for Schoology?

Schoology is used by teachers to post their classroom materials online, provide a safe forum for students to discuss their ideas and collaborate on projects, and to pass out and collect homework electronically. It helps students stay organized and it keeps the class connected.

An overlooked feature of Schoology is the ability for parents to create their own accounts which gives them access to their child's grades, their upcoming assignments, and classroom messages posted by the teacher. Parents can view any assignment submitted by their child, so not only do parents see the grade that was earned on the assignment but they can actually see the assignment that was turned in. Schoology helps parents to become more involved in their child's learning.

The one thing a parent will need to get started is the PARENT ACCESS CODE which can be given to them by the classroom teacher or emailed to them by a technology staff member. Contact your child's teacher first to get started!

Here are some helpful links to help you get started using Schoology.

  1. Create a new parent account using a Parent Access Code provided by your child's teacher
  2. Add multiple children to your Schoology account so you can access all of your children's information from one location
  3. Compare your parent account to your child's account to get an understanding of how Schoology works for you and for your child
  4. The Parents' Guide To Schoology provides a detailed explanation of how to use multiple features within Schoology

Tuesday, November 18, 2014

November 13 PD: Schoology, Mastery Manager, and Subtext

We offered a variety of professional development sessions each period for all eight periods on Thursday, November 13, 2014. The four 30-minute sessions I taught were:

  • Schoology - Self Paced Lessons
  • Schoology - Grading Rubrics
  • Mastery Manager - Grading Rubrics
  • Subtext
Schoology is gaining a great deal of interest due to the ability to tag all assessments and assignments with learning standards, create grading rubrics that are aligned to those standards, and then use a standards-based grading system. Teachers will schedule sessions to learn more about this through the Tech Boot Camp, Tech Buddies, and Tech Captains professional development sessions.

Mastery Manager is the software used for benchmark assessments that are aligned to curricular standards. It can capture a great deal of data regarding student and class performance and track those results over time. However, users say that it is cumbersome to use and that the online testing app is still buggy.

Subtext is software that allows students to read and annotate PDFs of books, textbooks and lecture notes. They can also digitally "raise their hand" to ask their peers for anonymous help. It is a great resource. A change to their pricing scheme slated to take effect July 2015 is keeping many teachers from pursuing the use of Subtext any further.

Monday, August 4, 2014

iPad pickup August 11-15 for Fremd High School students

Fremd students can pick up their iPads for the 2014-2015 school year during the dates of August 11 - August 15 between the hours of 8am and 3pm. All students will be able to pick up their iPads during these times. Freshmen will have an additional option of picking up their iPads during the Freshman Kickoff event on August 18. Students who do not pick up your iPad on one of these days will have to wait until school begins to pick it up from the Technology Center.

We expect heavy crowds on August 11. Please consider waiting until August 12 or later before picking up your iPad.

One way to save time is to sign up for the FAST PASS system.  The Fast Pass ticketing system allows you to choose a day and time that works for you which gives you priority access for picking up your iPad. If you use the Fast Pass system be sure to bring your ticket with you either in paper form or in mobile format.

To pick up your iPad you must be already be registered for school and have all your fees paid. You must also bring a photo ID which includes your junior high school ID or high school ID; your passport; your driver's license; a gym membership card, YMCA card or pool pass. It must include your name and photograph.

Students, you can only pick up your iPad. You will not be permitted to pick up anyone else's iPad even if they are family members. Parents are allowed to pick up an iPad for their children.


Monday, April 14, 2014

How to connect to the new wireless network called Aruba

Starting on April 16, 2014 the Fremd High School technology staff will begin installing a new wireless network which is scheduled for completion by April 30. During the two week installation period you may notice some inconsistency with connecting to the wireless network. The following information should help you to overcome any problems that you may face.

What is Aruba?
The new hardware is made by Aruba Networks, which sounds very promising, doesn't it? Who doesn't like Aruba? I bet it never snows in Aruba on April 14. Sorry, I've digressed. The new Aruba access points will improve the speed of the Internet and can handle more devices like laptops, iPads, and cell phones compared to the last set of access points. It will help the school keep up with the demand related to being a full 1:1 school starting in August 2014.

Aruba also gives the tech staff the ability to control the flow of data to make sure that school-issued devices like iPads have first priority over cell phone use. The devices used for teaching and learning will have better access to the Internet even when demand is high.

How do you connect to the Aruba access points?
When you are using your school-issued laptop you will not need to do anything to connect to Aruba. Your computer is already set up to connect automatically.

For your school-issued iPad you will have to sign in to the new network just once. To sign in to the Aruba network on your iPad go to Settings ->Wi-Fi -> and then choose D211-Mobile as your network. You will be asked to enter a username (your school computer login such as ksorensen in my case) and a password (your school computer password).  Your iPad will keep the network settings you enter so you will rarely have to log in again.

What about cell phones, laptops, tablets, and other devices brought from home? Any device owned by you and not the school should use the Guest network which does not require a username or password.

Troubleshooting
For two weeks there will be two systems running at the same time: the new Aruba network and the old Meru network. There can be conflicts especially when moving between rooms. The best tip to follow if your computer or iPad does not automatically connect to the Internet is to check your network settings. Laptops should be connected to D211 while iPads should be connected to D211-Mobile (new Aruba network) or Student 1:1 (old network) depending on where you are in the building. If you need assistance at any time please visit the Technology Center and we will be happy to help you.

The end result
On April 30 there will only be one system - Aruba. School-issued laptops will connect to the D211 network, school-issued iPads will connect to the D211-Mobile network, and all other personal devices will connect to the Guest network.

Apple TV
To use an Apple TV your iPad and the actual Apple TV device must be on the same network. We have already made changes that will allow you to continue using your Apple TV after the network change. As long as the Apple TV is on the Student 1:1 network and your iPad is on D211-Mobile (new Aruba network) or Student 1:1 (old network) then you can continue to use your Apple TV just as you had before.

Tuesday, April 8, 2014

Installing the new VPN client

What is VPN?

VPN is used to provide a secure connection to many computer resources that are safely protected back in the district office. If you are at home or anyplace else outside of school you can use VPN to send print jobs to a computer back at school, access your H Drive right on your computer, and get to protected district materials stored on the SIP, RTI, and other web sites.

Installing VPN

You can install or upgrade the VPN software yourself. There are two different scenarios below that will help you.  As of April 2014 the district was using version 3.1 of the AnyConnect VPN software.  
  • When you are outside of a district building you can open up a browser (like Chrome) and enter the address https://vpn.d211.org to get to the VPN login screen where you can install or upgrade the software. 
  • If you are still at school you will need to open up a browser and enter https://10.6.1.239 in the address bar to go to the VPN page to download or upgrade the software. 
As always, you can also stop by the technology center inside the school for assistance.

More information on VPN

Watch this video to see how to run VPN on your computer for the first time. If you have never heard of VPN watch this extremely ridiculous video shown below. It is less than two minutes long, it's actually very informative and accurate, and it will probably make you laugh.

Friday, November 15, 2013

Backing up your iPad before you update the iOS

You should back up your iPad before you update the iOS. Back up you iPad if you making a major upgrade from iOS6 to iOS7 and also if you are making a minor update from iOS 7.0.3 to 7.0.4.  Each update can cause you to lose settings or data. Back it up first!

The following steps will help most users but are especially useful to students in School District 211.

  1. Back up your data in Notability. To do this you need to open Notability, click on the Settings gearbox at the bottom of the screen, then choose Auto-backup. Choose either Google Drive (you can use your personal Gmail account or the school-issued one) or Dropbox to back up your data. If you want to add a second layer of protection, back your data up to iCloud as well. While you are still in your settings, click on iCloud and then move the slider to On. This will only work if you have enabled iCloud backups which we will cover next.
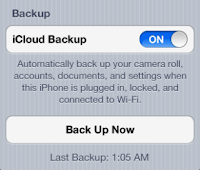
  2. Back up your iPad. Open the Settings app on your iPad, then click on iCloud, then click on Storage & Backup. Under Backup, move the slider to On for iCloud Backup. Then click on the button that says Back Up Now. This will create a copy of all of the data stored on your iPad. If something goes wrong with your iOS update you will be able to go back to this "copy" of your iPad and start over.
    1. Not enough storage? If you got an error when trying to back up your iPad you either have too many older backups or you are trying to back up too much data. To see if you have older backups, go to Settings, then iCloud, then Manage Storage. It will show you how many backup copies you have, and it will also tell you how much space you will need to make a new backup. If you have older backups go ahead and delete them, then create a new backup. 
    2. Too much data? If you do not have any older backups, that means you are probably backing up too much data. go to Settings, then iCloud to see what is being backed up. Turn off photos - this takes up the most space. You can back up your photos to another location like Google Drive or Dropbox which has much more free storage than Apple offers. Be sure your photos are being backed up elsewhere! Then continue with creating a backup of your iPad.
  3. Update the iOS. Go to Settings, then General, then Software Update. If one is available, then click on Download and Install. It will take anywhere between 5 minutes and an hour depending on the size of the update. You will not be able to use your iPad during the update.
Once the update is complete you will be able to use your iPad again. If you notice missing data or if something went wrong you can go back and restore your iPad using the backup you created earlier. If you need help with any of the above steps please stop by your school technology center and someone will assist you.

NOTE: Once you have iCloud backups turned on, your iPad will back itself up automatically every time it is (a) connected to Wi-Fi, (b) plugged in to a power source, and (c) in sleep mode. Basically, it will back itself up every night when you go to sleep. 

Friday, October 25, 2013

Headphone and microphone settings on a desktop computer

Step One: Confirm the USB is in the correct port in the back of the computer

In Lab 222 which is used by the World Language department the computers have six USB ports in the back. Four ports are together on the left and two more are next to them on the right. Plug the headphones in either port on the right side. Those have more power and work with the headphones best. Do not plug your headphones in the front!


...


Step Two: Check your Playback settings (to play sound through the headphones)

Your audio settings can be found in the tray on the bottom right side of your screen. It is the icon that looks like an audio speaker.
...

Right click on the audio icon and click on Playback devices.

...

In Playback devices you will likely see two devices. One is the internal speakers inside the computer. The other will be the headphone which will be labeled "Speakers - USB Audio". Click the speakers labeled "USB Audio" then click on OK.

...

Step Three: Check your Recording settings (to record with the microphone built into the headphones)

Your audio settings can be found in the tray on the bottom right side of your screen. It is the icon that looks like an audio speaker.  Right click on the audio icon and click on Recording devices. 

In Recording devices you will likely see multiple devices. One or more are for microphones that can plug in through a 3.5 inch connection (what is called a stereo mini connector). Another will be the microphone which will be labeled "Microphone - USB Audio". Click the microphone labeled "USB Audio" then click on OK.

...

Step Four: Check the properties of your microphone (to improve the volume of your recordings)

If your recordings are too soft, or if you cannot hear your recordings at all, it is possible that your microphone volume level is too low. Right click on the audio settings, choose Recording devices, and then right click on the USB Audio microphone. Click on Levels, and then raise the level of the microphone to 40. If you normally speak quietly you could raise the level to 50. Don't raise it to 100! You will pick up ALL the sound around you.

Tuesday, October 15, 2013

Schoology improved their integration with Google Drive, Dropbox, Evernote, and Khan Academy

Schoology made another huge improvement to their LMS today by upgrading their integration with Google Drive and by adding integration with Dropbox, Evernote, and Khan Academy. You now have even better access to the cloud-based files you use in class each day, and it opens up the possibility of allowing your students to create, store, and submit their homework using their preferred storage site.

Click on Resources then Apps on the top menu bar to get to your Resource connections. You will have the option of installing four Resources: Google Drive, Dropbox, Evernote, and Khan Academy. If you have already installed one of these then it will not appear on your list. Click the Resources you want and then click on Install.

Once you have the Resources installed you will be asked for the username and password for each one. Enter them and you will have access to all of your files from within Schoology.


Monday, September 30, 2013

Electronic Recycling Day is October 2 at FHS

The recycling truck is coming back to Fremd High School! If you have electronics that you want to remove from your home you can bring it to the FHS maintenance dock by the end of the day on Wednesday, October 2. A truck from Creative Recycling will arrive the next morning to remove your unwanted electronics.  Creative Recycling is recognized by the Illinois Environmental Protection Agency as an official e-waste recycler.

Bring in anything that has a plug on it (as long as it is not hazardous or radioactive) and Creative Recycling will take it. Creative Recycling will wipe out or destroy data on your old computers as well.
For an official list of acceptable material, click here: http://www.crserecycling.com/services/acceptable-material.html


You can find other locations to recycle your electronics if you miss the one at Fremd on October 2. SWANCC  (Solid Waste Agency of Northern Cook County) has a permanent drop off at the Hoffman Estates Village Hall, and they schedule one-day-only recycling events at various locations all year long. Go to the SWANCC web page to learn more: http://swancc.org/recycling/electronics-recycling

Tuesday, September 24, 2013

I downloaded iOS7 but now I lost some of my data

Like millions of other people around the world, you probably decided to upgrade your iPad to iOS7 the day it was released. In your haste, you may have forgotten to back up your data to iCloud before the upgrade and now you have learned that some things are missing.  Your wireless passwords might be gone. Notability may have disappeared. Things look bleak...

If you are a Fremd High School student and you are using the Symantec Mobile Management (SMM) app then we might be able to help you. Here are the steps you need to follow to try to recover all of your data:

  1. Reset the information inside SMM by going to your Settings, scroll down on the list of settings on the left until you see Mobile MGMT. Click on that, and then move the slider to reset the data.  Close your Settings.
  2. Open the SMM app. You will have to register again by following these directions. You can only register when you are inside Fremd High School so do not try to follow the directions from home. When you are done, the SMM app will close automatically.
  3. Check to see if the registration with SMM worked by opening the SMM app. If the app opens, it worked. If it does not you will have to register again. It might take two tries, but we have not seen anyone have to try it a third time. 
  4. Wait. It could take up to an hour before your wireless keys install themselves and before apps appear inside the SMM.
  5. Reinstall Notability and Explain Everything if they went missing after you upgraded to iOS7. This happened to a small but noticeable number of users. To download them for free you must open the SMM app, click on All at the bottom of the page, and then find Notability and Explain Everything.
  6. Switch your Wi-Fi network from "Guest" to "StudentOne2One" after SMM adds your wireless passwords to your iPad. 
  7. Go back into your Wi-Fi settings, click on the Information button next to the Guest network, and then click on "Forget this Network". This will help to keep you on the StudentOne2One network which has better bandwidth and faster speed.
  8. TURN ON ICLOUD! When you use this free service your iPad will create backups automatically
    every time your iPad is plugged in, locked, and connected to Wi-Fi. Please, please, please turn this on so your data backs up automatically every single day. Go to Settings, then iCloud, then Storage & Backup to turn on iCloud Backup or to create a backup for the first time.
  9. While you are at it, turn on Find My iPad. This will GREATLY improve our ability to help you track down your lost or stolen iPad. Go to Settings, then iCloud, then use the slider to turn on Find My iPad.
After following these directions you might still need assistance. Please stop by the Technology Center at Fremd High School and we will be happy to assist you.